Shell Solid Tool:
Often you will want to edit an object by 'opening it up'. For example turning a cube into an open box, a hemisphere into a bowl or even an extruded polygon into a floor and set of walls!
To do this we can use the Shell Solid Tool. In the Mode Bar set the Shell Preferences to the desired thickness and also select either 'Shell Inside' or 'Shell Outside'.
Select the face to shell and in the Mode Bar select the Green Tick Button to complete the command.
We can always change the thickness of the shell in the Object Info. Palette afterwards.
We can shell very complex shapes but make sure that you save your work first just in case the computer cant take it and crashes!
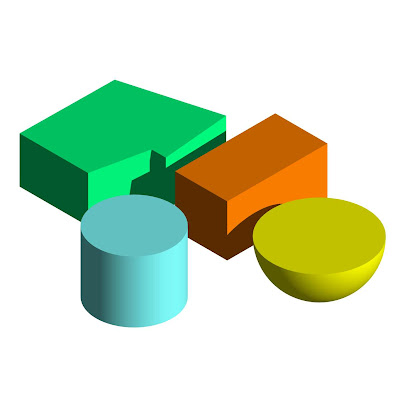
We can also use the Shell Solid tool to add a thickness to 3D Polygons and NURBS Surfaces. We will look at this later though!
Sunday, 25 April 2010
Filleting Edges
Once we have created 3D objects there are many tools to edit and refine them further. These are also located in the 3D Modeling Menu in the Tool Sets Palette. There are too many to go through today but we will look at the main ones that I think you will need to use.
Fillet Edge Tool:
Most 3D objects do not have perfect sharp edges but are instead smoothed off with a fillet edge. Placing these onto objects will add extra detail and quality to your model and help the renders achieve greater realism.
Note that in the Mode Bar we can set the Fillet edge Preferences. Firstly set the fillet Radius and secondly whether to fillet either a single Edge or a whole Face.
Select the edge or face that you wish to fillet and in the Mode Bar select the Green Tick Button to complete the Command. Note that by holding down the shift key we can select multiple edges or faces to fillet.
It is a good idea to wait and go through your model at the end of a project and place fillets on the relevant edges.
You may also need to use the fillet tool more radically to alter the form of an object. We can turn a cylinder into a pill shape or even a sphere if we place a big enough fillet.
The Fillet Radius can be altered afterwards in the Object Info. Palette. To take a fillet off an object we need to select it and go to Modify> Ungroup.
3D Primitives
We have looked at taking 2D shapes and giving them an extrusion value using the Model> Extrude tool. Vectorworks also has many 3D Primitives which does this process in one simple step. There are also tools which create 3D shapes not possible through Linear extrusion, such as cones, spheres and hemispheres.
To model using 3D Primitives go to the 3D Modeling Menu in the Tool Sets Palette.
Cylinders and Cones (By Radius Mode):
Select the view you require and click to determine the objects center point. The computer will then ask you to input a height value (this can always be changed later either manually or through the object Info. Palette). Next drag the mouse out to determine the radius of the Primitive.
Spheres and Hemispheres (By Radius mode):
Click to determine the objects center point, drag the mouse out to determine the objects radius, click again to complete the command. Hemispheres will be drawn with the flat surface at the base, to rotate go to the required view and use the Modify>Rotate> Flip Vertical /Horizontal Commands.
As with all tools, have a go at the different modes of drawing available in the Mode Bar.
Extruded Rectangle / Extruded Polygon:
Click to determine a corner point of the object, input the height value required and then drag and draw to complete the object. Remember to double click to finish Extruded Polygons.
Editing Primitives:
3D Primitive Rectangles and Cylinders act just like extruded 2D Primitives. we can double-click on them and 'go inside' the extrusion. We can now edit the shape, add surface, clip surface etc.
Editing Extruded Polygons is done slightly differently. You will notice that they are called 'Meshes', this means that instead of being one solid object they are made up of many seperate 3D Polygons. Double-click on the Mesh and we can now edit individual planes. Each plane can be given a different colour, or we can delete, resize or move individual planes.
Duplicate Along Path Tool
We can also duplicate objects and symbols along pre drawn paths (any 2D object) by using the Duplicate Along Path tool.
In the Preferences Box we can decide to place the object at set intervals along the path or decide on the number of duplicates to be placed.
Select Tangent to Path to place the duplicates consistently at right angles to the path.
When modelling architectural schemes it is often useful to use the same path for more than one task. For example if we use a path to model a curved sofa we can use it again to place a set of tables in front of it.
For this to work however we must first off-set the original path to the required distance so that the tables will position themselves parallel to the sofa path.
It is always useful to keep copies of paths that you use as you may need them later on.
We can also duplicate Light sources along paths.
Exercise : Model of seating and table/ Model of Bar area.
Websites: www.designboom.com (Becks Bar Competition)
Multiple Extrudes
Another tool with interesting results is Model >Multiple Extrude.
By drawing a series of 2D shapes on top of one another (or by placing them in a specific hierarchy), selecting them and then using the command, an extrude of a particular height with varying cross-sections is created. These can be edited afterwards by double-cli
Extrude Along Path Tool
So far we have looked at simple linear extrusions which keep a constant profile in one direction. Today we will be looking at a range of advanced modeling tools that extrude in all sorts of directions and have some great results!
Extrude Along Path Tool:
The ‘Advanced’ Extrude that you will probably use the most frequently is Model >Extrude Along path.
As the name suggests this requires at least two parts to complete the extrusion. It is made up solely of 2D shapes one of which acts as the path object and the other/others as the profile.
Extrusions along paths are always positioned flat on the ground plane despite which view you create them in. You will have to rotate them afterwards to position them vertically etc.
Also note that the center of the extrusion is placed at height=0. The Extrude Along Path will require moving up and re-positioning in an elevation view.
Both the Path and the Profile can be edited/added to by double-clicking on the extrusion and selecting the desired part to alter from the command box. Click on the 'Done' button to see the updated extrusion.
These tools are all kept in the Model Menu.
Extrude Along Path Tool:
The ‘Advanced’ Extrude that you will probably use the most frequently is Model >Extrude Along path.
As the name suggests this requires at least two parts to complete the extrusion. It is made up solely of 2D shapes one of which acts as the path object and the other/others as the profile.
- Paths can be either simple primitives (circles, rectangles, arcs) or Polylines/Polygons. When drawing paths it is often useful to construct one from a series of separate lines/polylines, this ensures a level of accuracy to the path. Make sure that the lines are connected at their end points and connect using Modify> Compose. This will result in a new single polyline.
- The ‘Profile’ can be formed of single or multiple 2D shapes. Each shape can have its own colour- but not its own texture!. Note that the profile is positioned with its center along the path.
Extrusions along paths are always positioned flat on the ground plane despite which view you create them in. You will have to rotate them afterwards to position them vertically etc.
Also note that the center of the extrusion is placed at height=0. The Extrude Along Path will require moving up and re-positioning in an elevation view.
Both the Path and the Profile can be edited/added to by double-clicking on the extrusion and selecting the desired part to alter from the command box. Click on the 'Done' button to see the updated extrusion.
Thursday, 22 April 2010
Subscribe to:
Posts (Atom)